Slow Cooker Sunday: Fruit Cobbler (Dessert)

Now I know I've already posted one Slow Cooker Sunday recipe today, and I also know that I've also posted this recipe several months ago, but this is the first time I've tried doing the fruit (in fact any dessert) in the slow cooker. Plus it's my blog and I want to post it again, so there you go. I've used the slow cooker for the first part of the recipe as I have no idea if the cobbler bit would cook in it, another time I'll test that out.

Fruit Cobbler

Ingredients:
Serves 4-6

  • 800g of mixed fruit, I went for apples, plums, pears and nectarines
  • 160g caster sugar
  • 2 tbsp water
  • 300g self raising flour, sifted
  • 85g unsalted butter, cubed
  • 1 tsp baking powder
  • 3 tbsp milk
  • 150g Rachel’s Low Fat Natural Bio Live Yogurt

Method:

  1. In the slow cooker take the fruit, 100g of the caster sugar and add the water, cook until the fruit softens. Tip: leave the fruit to cool before adding the cobbler pieces this will stop some of the fruit bubbling out over the dish.
  2. To make the cobbler, add the sifted flour, butter, baking powder and the remainder of the sugar (60g) and using a food processor or mixer whiz together for a few seconds on pulse speed until fine crumbs form.
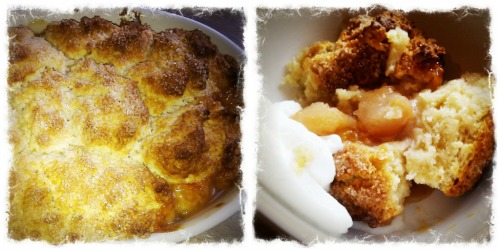
  3. Add the milk and yogurt and whiz again until a soft dough forms . You can either spoon the mixture in scattered clumps over the fruit or add a little more flour and roll out the dough using a cutter. Leave some gaps for the cobble effect.
  4. Bake the cobbler for 30-35 minutes until the topping is golden and the fruit is visibly bubbling beneath.
  5. Serve with vanilla ice-cream, custard or clotted cream.
Pop yourself over to Slow Cooker Sunday on Mediocre Mum to see other entries

Apple Preserves

Several months ago, my mum put a condiment on the dinner table which was gorgeous. It was an apple and mint jelly. Was it for pork, was it for lamb? Did it matter? I'm vegetarian so whatever it was originally meant for was never going to be something that I would consume. Nonetheless it was delicious with salads and baby boiled new potatoes smothered in butter and black pepper.

I've tried to find it, to no avail. Then when the 'chutney chums' (i.e. The Crazy Kitchen, me and Mummy Mishaps) started talking about all things preserving a few weeks ago, I thought I'd give it a go.

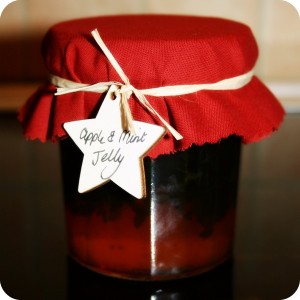
Apple and Mint Jelly

Makes: 2 jam jars

Ingredients:

  • 1kg apples, peeled and cored
  • 1 litre water
  • 30g fresh mint, chopped
  • 500g caster sugar
  1. Add the apples and 2 tablespoons of water to a large saucepan, cook for twenty minutes over low to medium heat. Spoon the mixture into a large sieve with a sterilised muslin (I used one of The Boy's unused muslins sterilised with a steaming hot iron) and let the juice drain into a bowl. (Try to leave for 3 hours, I didn't have that amount of time so I left it for 2 hours).
  2. Add the mint and 1 litre of water to a saucepan and bring to the boil. Remove from heat and set aside for 10 minutes.
  3. Pour in the strained apple juice and add sugar. Bring to the boil, reduce heat and and simmer gently for 1 hour+, stirring constantly. (The original recipe said 40 minutes, I ended up simmering it away for an hour and a half before it reached setting point).
  4. Pour into sterilized jars, cover with damp cellophane covers (which will tighten as they dry, creating an air-tight seal) and leave to cool. Store in a dark, cool cupboard. They should have a best before of a year from sealing.

My recipe has been adapted from one on AllRecipes.co.uk. I also found this site most helpful when I was trying to work out if it had reached setting point.

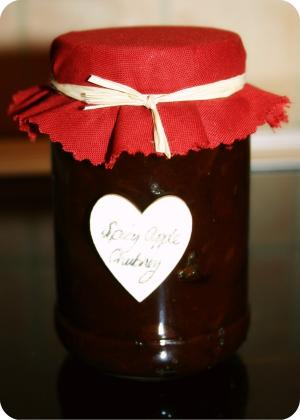
The big question of what to do with all that left over apple arose. So I made some Spiced Apple Chutney!

Ingredients:

Makes 2 jam jars

  • 225g onions (chopped)
  • 900g apples (cored & chopped)
  • 110g sultanas or raisins
  • 15g ground coriander
  • 15g paprika
  • 15g salt
  • 15g each of cinnamon, nutmeg, ginger
  • 340 granulated sugar
  • 425ml white wine vinegar
  1. Put all the ingredients into a heavy pan.
  2. Slowly bring to the boil until all the sugar has dissolved.
  3. Simmer for 1½-2 hours, stirring from time-time to stop the chutney from sticking.
  4. Take the lid off to reduce down for further thirty minutes or so.
  5. When it is very thick and a spoon drawn across it leaves a channel which doesn't immediately fill with liquid, the chutney is ready to transfer to the jars.
  6. While still hot, turn into sterilised jars, use wax discs and damp cellophane to seal. Allow to cool.
  7. Store in a cool, dark cupboard for two-three months before eating. Can be kept for up to twelve months sealed.


I adapted this recipe from one on the BBC Good Food Guide.

Tips:

  • Sterilise jars and utensils in the dishwasher.
  • Use wax discs and cellophane film lids as lids from jars can corrode effecting the chutney. Also it has to be put in piping hot for the dimple on the lid to suction down or it's not sterile.
  • Sterilise the muslin with a hot iron.
  • When fastening the fabric cover, hold it in place with an elastic band first. If you are one of those genetically-modified humans who have four hands, and can therefore hold the fabric in place and wrap the raffia around, don't bother, you'll be fine. Once the raffia is wrapped around, remove the elastic band.
Related Posts Plugin for WordPress, Blogger...